How To Create An Animated Portrait with Photoshop

As promised, I’m also using this blog space to share some neat illustration tricks and techniques. And this first tutorial is for something I love creating: Animated Portraits.
Though there are a lot of animation software and apps out there, all I use in creating these is Adobe Photoshop. Yes, just Photoshop.

Animating with Photoshop means frame by frame animation. So it involves making several frames first then exporting them in gif format so they can be in a continuous loop.

Rosie the riveter animated version by Denise Tolentino

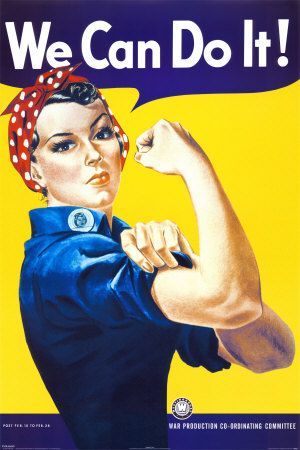
For the purpose of this tutorial, I’m going to use this illustration. It’s my Filipino version of Rosie the Riveter.


98a6c6352f35f9b40c21942deb7531e3
The original and iconic Rosie the Riveter Poster by J. Howard Miller


Why Animated Portraits?
1. People are my favorite subjects. Adding a few simple movements helps add more personality and character.
2. Creating animated illustrations helps my work stand out from other static content on social media.
3. It’s like a bite-sized cartoon so it looks more fun!

Why would it be great for you to learn?
1. It’s pretty easy and yet it can add a lot more value to your illustrations.
2. Learning the basics will give you ideas on how to further use this animation feature  for other concepts.
3. It’s just a lot of fun to do!

What You Will Need:
1. Basic Photoshop knowledge – I am not going to explain the basics of Photoshop such as the use of layers and different tools. If you’re a beginner and want to know the basics, you can start here.
2. A mouse or a Wacom tablet –  just to make drawing easier. I’ve used a trackpad before, not fun.
3. Adobe Photoshop – yes, this is all the software you need for both the drawing and animation part.

I learned how to do this by watching a bunch of Youtube tutorials, though at the time I was looking, there was no tutorial that was specific to making gifs with drawn frames. (Or no properly explained one.) I kind of had to piece all this information together.
Now I see there are a few new ones out there. Some may have different techniques and steps but what you will find here are the steps that made sense to me.


SO, LET’S GET STARTED

Step 1: Plan Your Animation
It can be as simple as a rough sketch with notes, like the one below. But if the animation is a little more complicated, you’ll want to make a rough storyboard. You can do this on paper or you can create a layer for it on Photoshop.

The purpose of this step is to clearly identify which parts will have movement.
This is crucial since you will create a separate layer for each moving element.

For this example, I’ve identified 3 moving parts: the eyes, the forearm, and the mouth.

How-To-Create-Animated-Portrait-Step-1

Step 2: Start Drawing
I like to work directly on the size of my output since it saves me an extra step.
I created this one for Instagram. so my document size is the size of an Instagram portrait image: 1080 x 1350 pixels. Feel free to work on a bigger document and then resize later on.

How-To-Create-Animated-Portrait-Step-2
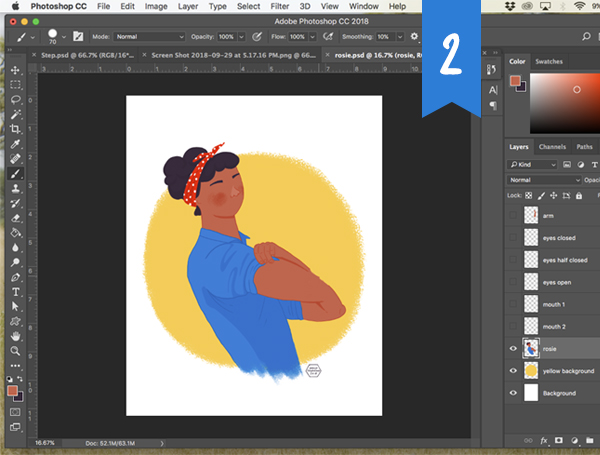
You will notice that I’ve created a separate layer for all the parts that move. I also created more than one layer for each part’s variations. Example, for the eyes, I made a separate layer for open, half-closed, and closed.

How-To-Create-Animated-Portrait-Step-3

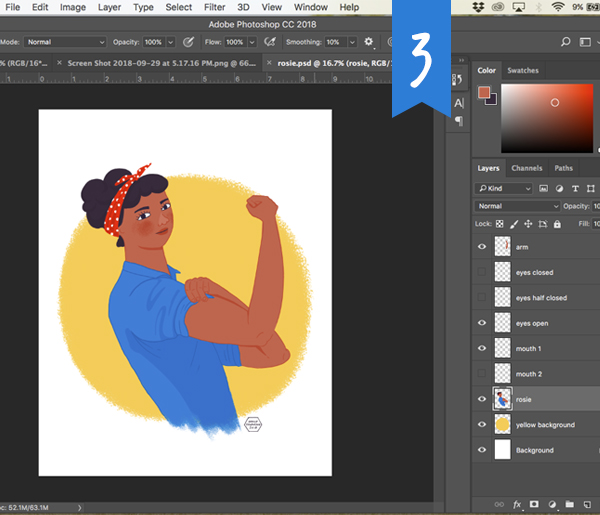
Step 3: Save Each Movement as a jpeg.

Each jpeg file will be a frame in your animation. So make sure that you have a jpeg file or frame for each movement.

Once all your layers are drawn. Turn on all the layers for your first frame.
Save that as one file.

How-To-Create-Animated-Portrait-Step-4

The next movement is Rosie’s arm flexing towards her. So I click on the layer of her forearm and with the Transform tool I rotate it slightly. Then save that as another file.

How-To-Create-Animated-Portrait-Step-5

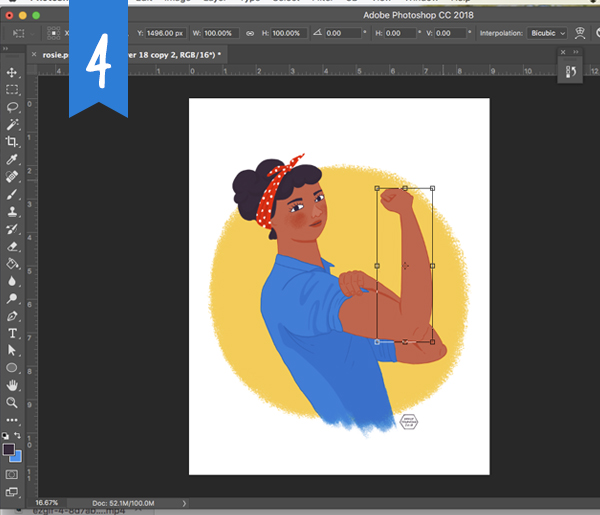
For this animated portrait, I end up creating 9 different frames.

How-To-Create-Animated-Portrait-frames.jpg
Once you have saved all the jpegs. You can close your original Photoshop file.


Step 4: Photoshop Timeline
Now for the animation part!

Now go to File > Scripts > Load Files Into Stack

How-To-Create-Animated-Portrait-Step-6
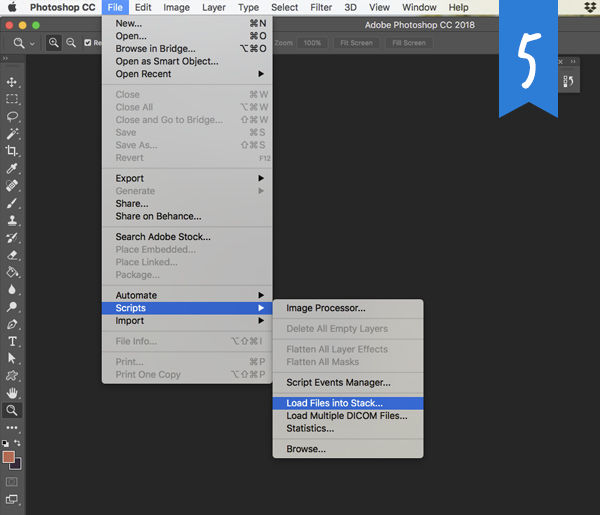
Click on Browse and select all the jpeg files you saved from your illustration.How-To-Create-Animated-Portrait-Step-7

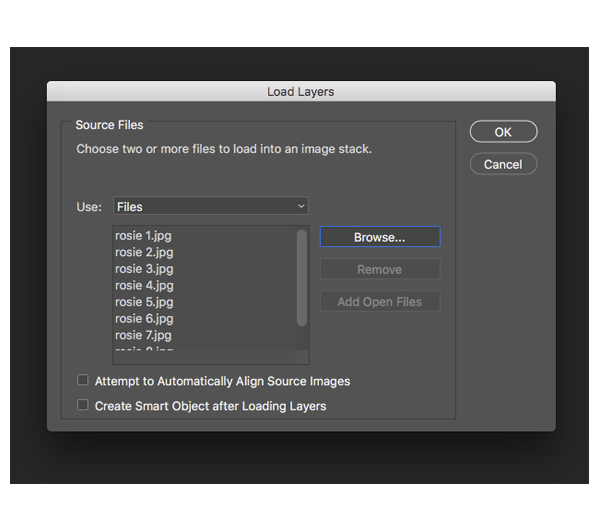
Turn on the animation feature by clicking Window > Timeline
How-To-Create-Animated-Portrait-Step-8

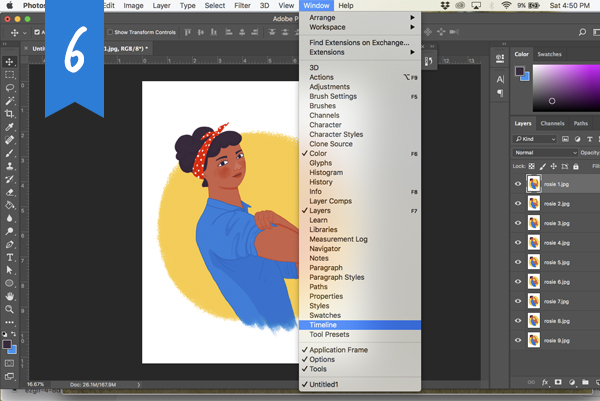
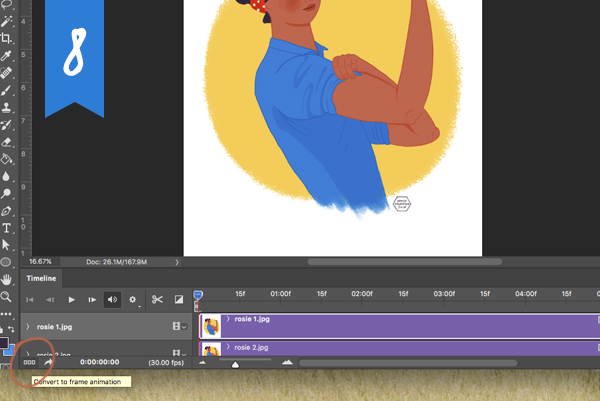
This will open the Timeline bar at the bottom. Click on Create Video Timeline
How-To-Create-Animated-Portrait-Step-9

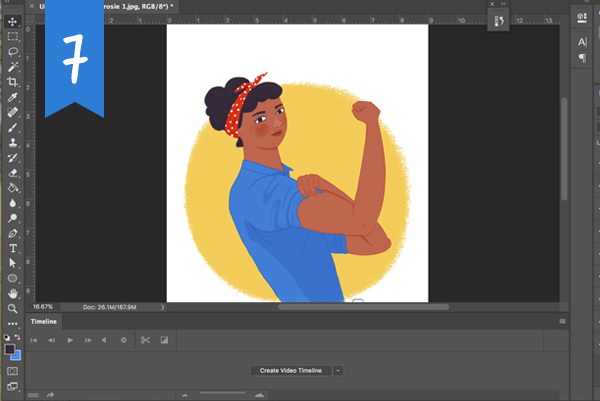
Click on the tab with 3 blocks at the bottom left to Convert to Frame Animation

How-To-Create-Animated-Portrait-Step-10
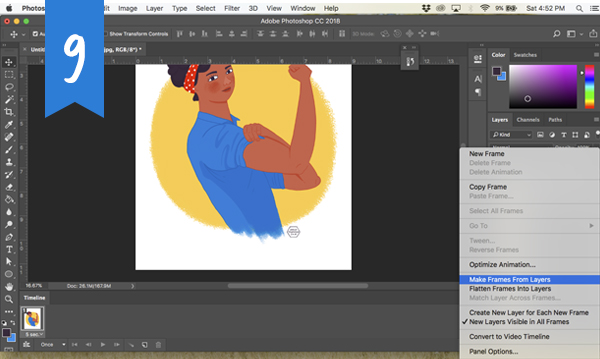
Then go to the upper right tab of the Timeline bar (the one with 3 horizontal lines), and click Make Frames From Layers

How-To-Create-Animated-Portrait-Step-11

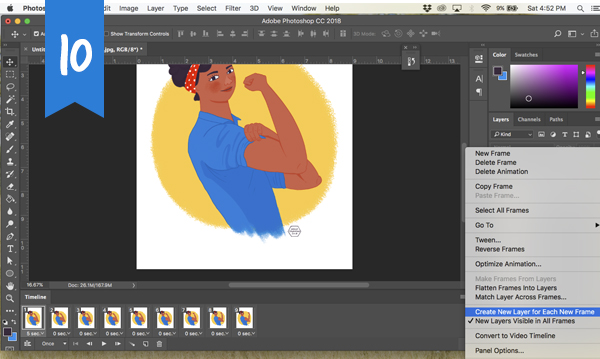
You will see your layers appear on the Timeline bar. Click on the same tab and select Create New Layer For Each New Frame.

How-To-Create-Animated-Portrait-Step-12
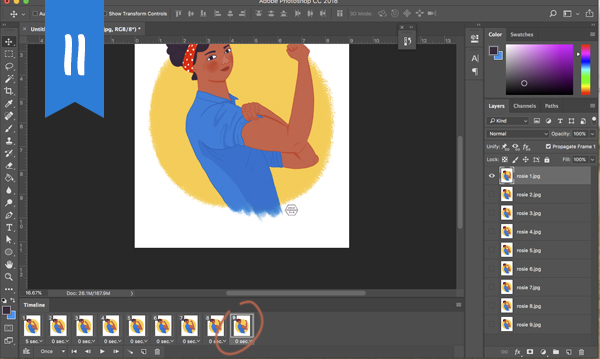
You will see that when you click on a frame on your timeline, it shows which file is selected on the layers tab. Usually the last frame on your timeline  is your first animated frame. I’m not sure why this happens, but this is where you do a little rearranging. Simply drag your timeline frames to arrange them according to their proper sequence..

How-To-Create-Animated-Portrait-Step-13

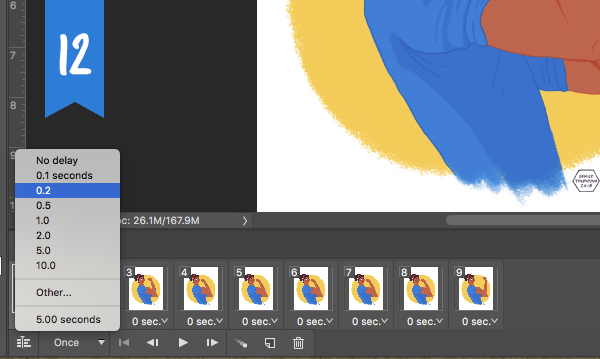
Once all the frames are arranged, click on the tab below each frame to assign a duration in seconds. My default is 0.2 seconds for each frame. You can experiment and preview how this by clicking the play button. Adjust according to your preference.

How-To-Create-Animated-Portrait-Step-14

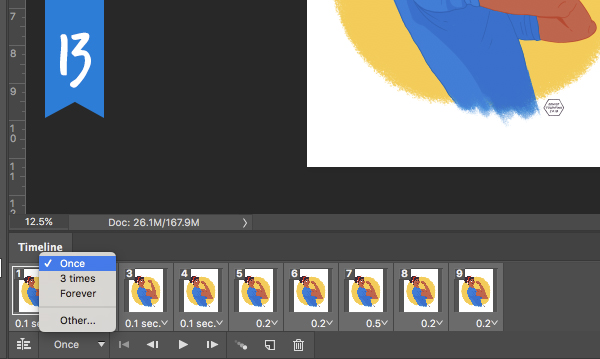
To ensure that my animation loops, I click on the tab labeled “Once” and select Forever.

How-To-Create-Animated-Portrait-Step-15

NOTE: The video length of your gif is dependent on the total number of seconds of your frames not on how many loops you give it. So since I want this one to reach 4 seconds
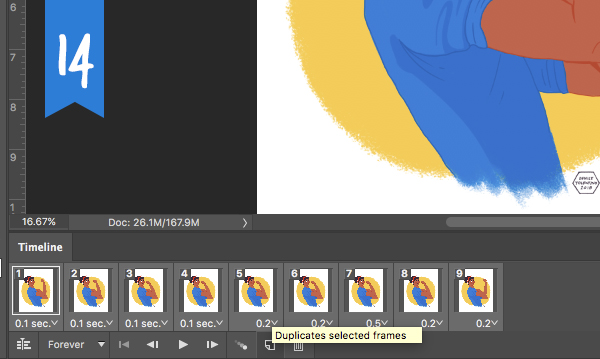
which is the minimum video length of Instagram, then I have to lengthen my animation. I do this by duplicating my frames.

Simply highlight all your frames and then click on the little square tab beside the trash bin tab. For this illustration, I duplicated my frames twice. That’s 3 sets in total.
How-To-Create-Animated-Portrait-Step-16

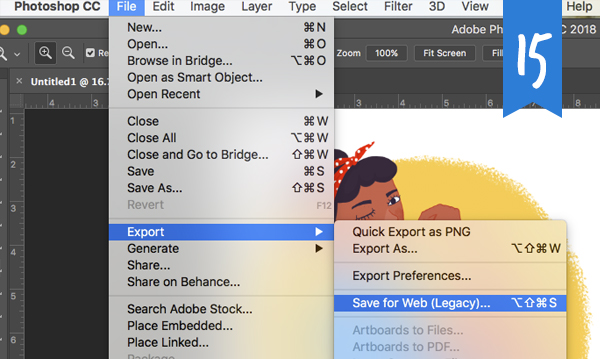
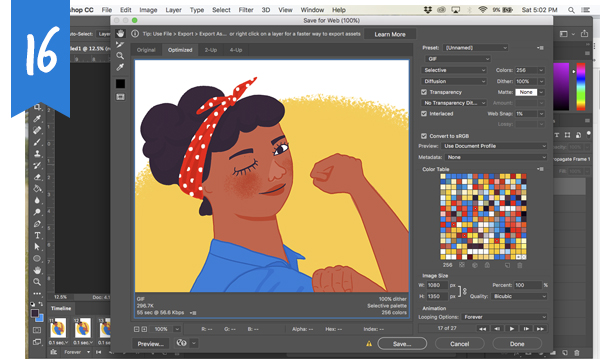
Once you’re ready with your frames. Hit File > Export > Save for Web (Legacy)

How-To-Create-Animated-Portrait-Step-17

This dialog box pops up. I don’t mess around with the settings here as the default ones work for me. Just click Save, name your file, and YOU’RE DONE! You’ve created a gif!
Now you have an animated portrait! 🙂

How-To-Create-Animated-Portrait-Step-18

2nd NOTE: Gif files are great for websites, emails and chat spaces, but you’ll need to convert them to other formats to post them on social media platforms.

For Instagram, convert it into an mp4 file. Use ezgif.com . It’s FREE!
For Facebook, your gif has to be a hosted file. You can do this by uploading your gif to Tumblr or Giphy. Then you copy the link and upload that instead.

That’s it! 
I hope this guide was easy to follow.  If you have any questions, please feel free to ask.
Remember that you can do this even with a simple line drawing. If you want to check out some of my other animated portraits, you can find them here.

If you try it out for yourself, send me a link or tag me on Instagram so I can check it out. I’d love to see what you created. 😀


My Online Store on Society6 and Shopkeeper Picks

Let me give you a little tour of my store and my recommendations as the shopkeeper / artist.


When you click on the “Shop” tab on my website, it leads you to another website called Society6.com.

Society6.com is a marketplace and print-on-demand service. This means that for artists like me, we can upload our artwork and pick out products for our artwork to be printed on. The items range from the typical like canvases, posters, or shirts to more surprising items like cutting boards and shower curtains. This, I think, is great. Because for an individual who never thought that he or she could add character to a kitchen counter with an artist-designed cutting board… WELL! Now you  can art-the-heck out of that corner!

Most people think I keep an inventory of the stuff I sell. I don’t. The beauty of Society6 is it lets artists like me focus on creating. They take care of the other tasks I don’t even want to allot brain space for like production and shipping. When someone orders a product, we get a little percentage of that sale. Yes, a little. But that’s okay. Because it saves us a ton of headache and our designs are up and available for orders forever. It’s really just a great way to make art affordable and accessible to a lot of people.

If you want to know more about how Society6 works or how you too can start selling on it, read this review I wrote for HomeWorking Club.

Now, I realized that going through my shop may feel a little overwhelming. I’ve uploaded 28 illustrations/designs to date (and plan on adding more!), and have made each one available on 15-20 different products. That’s a LOT. So, as a gracious shop owner, I would like to make things easier for you by giving you my recommendations. I’ve made a list of the best item to buy for each design and have gathered it into a list called How to Decorate Your Place With my Drawings.

You can just click on the link and browse that page, you can also read a brief explanation about some items below.

Island Life Series – I highly recommend displaying this as a series, in either same size or varying frame sizes.

Artsy living room with Ocean Heart wall tapestry illustration by Denise Tolentino

Ocean Heart –  stunning as wall tapestry. The tapestries are durable enough to be used as picnic blankets too!

Denise Tolentino Illustrated Beach Towel on Society6
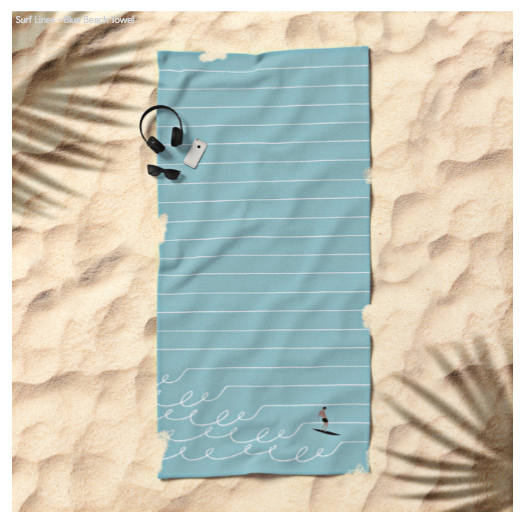
Surf Lines – I created this design specifically for beach towels and blankets because I thought stripes are great patterns for them. But I was surprised at how good it looked on other things as well.

Shower curtain design with cheering crowd illustrated by Denise Tolentino
Cheering Crowd – definitely get it as a shower curtain because this design came to mind when I thought about how much people like singing in the shower. We could all use the support, right? 😀 I made wall tapestry versions too.

Metal print featuring river and girl on a paddle board illustrated by Denise Tolentino
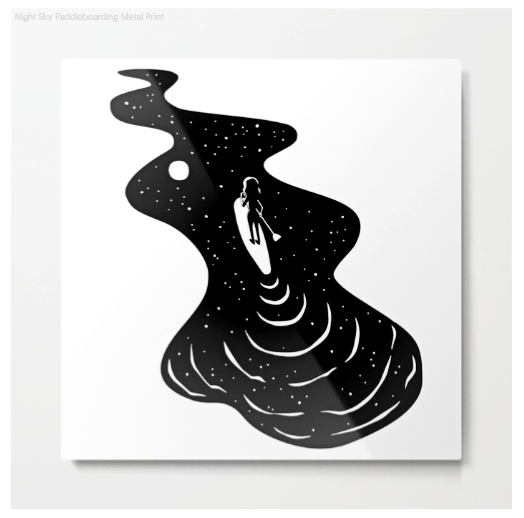
Night Sky Paddleboarding – looks great as a metal print. The lightweight aluminum sheet really enhances the shine of the moon and stars reflected on the river. <3

Cutting board with illustration by Denise Tolentino
Green-Minded – Don’t worry, you won’t be chopping on her face, as this is the reverse side. But imagine it hanging on your kitchen this side up? Pretty cute!

Mug with zebra illustration by Denise Tolentino
Is there any better affirmation while you’re contemplating over a cup of coffee or tea?
Do Whateverthefuck Makes You Happy is a mug that’s probably not safe for work but you’d want on your desk anyway.

If you’d like to see the rest of my picks, check out my curated list called How to Decorate Your Place With my Drawings.

Please remember that these are merely suggestions. What matters to me is that you find something you like. And when you do find something you like and order, please send me photos because I’d love to see you wearing or using my items! And by the way, my shop  is open 24 hours. 😉 Have fun shopping!


Society6 accepts debit and credit cards. You may also pay via your Amazon account or Paypal. For delivery times, check the table below or click here.

Society6-delivery-times-denise-tolentino

Yay Monday – Free Original Illustration Just for You!

Yes! Free download of awesome, original Illustrations for your desktop and/or mobile!

This is me, officially promising you my dear blog follower, a free illustration every month.

These free illustrations will be available on the first Monday of every month. Why Monday? Because I like Mondays. I like it for the specific reason that a majority of people don’t. On Mondays most people are in a grumpy, anxious, or obligated-to-be-positive mood, which means there is more opportunity to cheer people up.

So here’s my attempt today. An illustration to remind you that whatever it is you need to accomplish, to deal with, to cross of your list: You f*cking got this. I mean, who are you gonna listen to? Your stupid, crippling self doubt or to Mahkah – the original G.O.A.T. (Greatest of the Order Artiodactyla Team)? And yes, I invented that acronym.

Moving on.

This dude, he traverses deadly, slippery mountain cliffs everyday. Do you have a fear of heights? He does too! Does he give up? Hellz no. The cool breeze is up top. So is the sweet view. And from up there, we all look like peas-ants. Get it? Peas… nevermind.

So this is your free illustration for the beginning of the week, the (almost) beginning of the month, and the beginning of the whirlwind “ber” season. You F*cking Got This.

These free downloadable illustrations come in 3 color palettes: Kinda pink, Original Black & White, and Retro blue. Click on the thumbnails to download the appropriate file for your device. Open, right click and save!

Oh! And don’t forget to tag me on Instagram, Twitter or Facebook when you use it! 🙂 Have a great Monday!

Desktop

HD Standard 4:3 | 1024 x 768
Illustration of goat saying you fucking got this by Denise Tolentino  Illustration of goat saying you fucking got this by Denise Tolentino . Illustration of goat saying you fucking got this by Denise Tolentino

HD 16:9 | 1366 x 768

Illustration of goat saying you fucking got this by Denise Tolentino  
Illustration of goat saying you fucking got this by Denise Tolentino . Illustration of goat saying you fucking got this by Denise Tolentino


Mobile

750 x 1334 (iPhone 6, 6s)
Illustration of goat saying you fucking got this by Denise Tolentino
 . 
Illustration of goat saying you fucking got this by Denise Tolentino  
Illustration of goat saying you fucking got this by Denise Tolentino

1440 x 2560 (Samsung Galaxy Note 4, , LG G3, etc.)
Denise-Tolentino-YFGT-Illustration-pink . Denise-Tolentino-YFGT-Illustration-bw . Denise-Tolentino-YFGT-Illustration-blue

1080 x 1920 (iPhone 6 Plus, iPhone 6s Plus, Samsung Galaxy, Sony Experia, etc.)
Illustration of goat saying you fucking got this by Denise Tolentino . 
Illustration of goat saying you fucking got this by Denise Tolentino